Vanguard Lift
A luxury lift interior is a small room in motion, where every finish must look refined and withstand daily use. This guide, “10 Tips for Designing a Custom Luxury Lift Interior,” explores how to design a custom interior for a luxury lift without treating beauty and performance as separate goals. A bronze handrail, veined stone panel, or warm light can shape the experience. Each choice also affects weight, cleaning, durability, and comfort.
Dieter Rams, the renowned industrial designer, offered a useful principle: “Good design is as little design as possible.” Applied to lift interiors, that idea favors thoughtful restraint over decoration for its own sake. Choose materials that suit the building, lighting that flatters surfaces without glare, and details that feel comfortable at close range. Then coordinate the concept with qualified lift professionals, who can confirm technical requirements before finishes are specified. Small details matter.
The ten tips ahead cover style, materials, lighting, mirrors, flooring, handrails, accessibility, and maintenance. They also consider how the cabin connects with the wider architecture, from a hotel lobby to a private residence. A polished sample can look different under real cabin lighting, and a beautiful finish may demand more upkeep than expected. That is worth questioning early. Good customization is not simply about adding luxury; it is about making each decision coherent, safe, and practical for the people who use the lift every day.
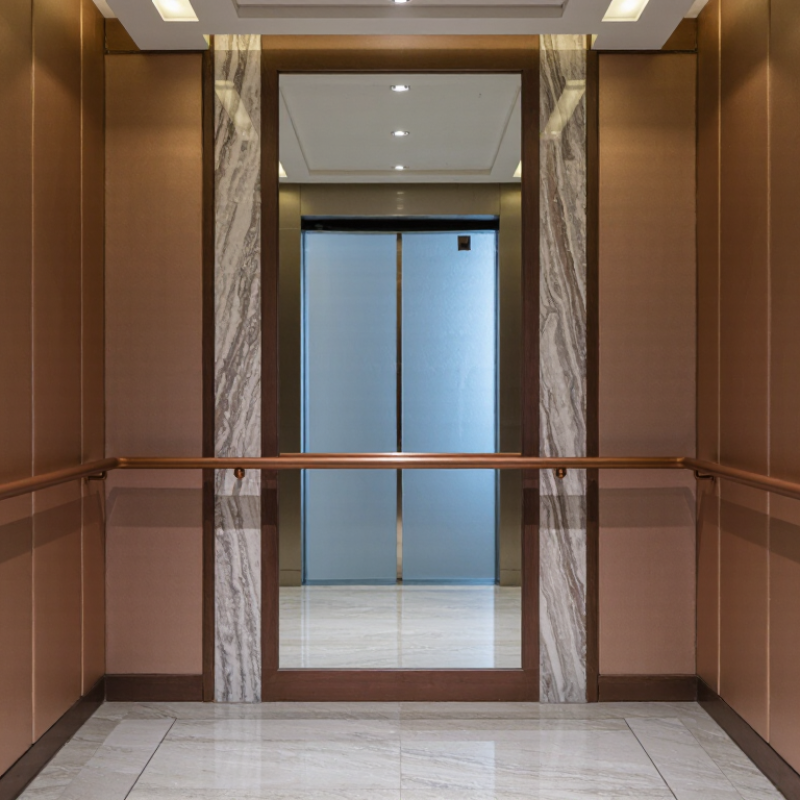
A custom luxury lift interior should begin with a clear purpose, not a finish sample. Ask what the lift needs to communicate: quiet confidence in a private residence, or a polished welcome in a hotel. Define priorities such as durability, warmth, privacy, and ease of cleaning. Keep the list short. A lift is a small room, and competing ideas quickly feel crowded.
Then identify users and observe how they move through the space. A family may carry groceries, a child may press reachable controls, and older guests may need steady handholds and readable indicators. In a busy building, people enter with luggage or mobility aids, so turning space and door timing matter as much as the wall finish. Notice the lighting at eye level. Glossy panels can reflect harsh points and make faces less comfortable to see.
Ask users what feels awkward, not only what looks attractive. Their answers may challenge the original concept. That is useful. Record traffic patterns, cleaning routines, and the lift’s expected daily use before selecting materials. A textured surface can feel rich, yet collect dust in corners. Test samples under the actual cabin lighting, and check that handles, seams, and controls remain easy to reach. Some details will need revision after a mock-up; pretending otherwise can waste time. A thoughtful brief gives designers and fabricators shared criteria, while leaving room for the small surprises of real use.
Establish design goals and understand the lift’s users.
These illustrative planning ratings reflect common accessibility and usability considerations; they are not survey results. Use them to guide discussions with the lift’s users and project team.
Measure the finished cabin, not just the original plan. Record clear width, depth, ceiling height, door opening, and threshold level. Note where handrails, control panels, lights, and access hatches sit. A few millimetres can matter when adding stone veneer or a deeper wall panel. This is where a neat drawing can mislead.
Use recognised technical references before selecting finishes. EN 81-70:2021 lists an accessible Type 2 car with a 1,100 × 1,400 mm internal floor area. Treat this as a reference, not a universal cabin size; local specifications and the existing lift determine what fits. Check the rated load, door mechanism, ventilation, wiring routes, and maintenance access with the lift contractor. ASME A17.1/CSA B44 is another key safety reference in markets using those codes. Details vary.
Bring a laser measure and photograph every obstruction, including the ceiling hatch and the narrow return beside the door. Ask for the latest manufacturer’s layout and compare it with site measurements. Confirm how much the proposed finish adds to wall thickness and cabin weight. Keep removable panels where technicians need access. I would recheck the door clearance after mock-up; it is easy to overlook. A luxurious finish should not compromise operation, service access, or usable space.
| No. | Design Tip | What to Measure or Check | Why It Matters | Practical Design Action |
|---|---|---|---|---|
| 1 | Survey the finished cabin dimensions | Record internal width, depth, and height in millimetres at several points. Note wall irregularities, corners, and any existing finish layers. | Cabin walls may not be perfectly square, and usable space can differ from nominal lift dimensions. | Base each panel and finish drawing on verified site measurements. Confirm whether measurements are taken before or after existing finishes are removed. |
| 2 | Measure the entrance and door zone | Record the clear door opening, door height, sill width, entrance returns, and the position of the door track and sensors. | Decorative trims or projecting panels can interfere with door movement, sensors, or the clear opening. | Keep finishes clear of moving door parts and safety devices. Have the lift contractor confirm required clearances before fabrication. |
| 3 | Locate controls and safety equipment | Map the control panel, alarm and communication devices, operating buttons, indicators, handrails, and any inspection or service access points. | These components must remain accessible, visible, and usable after the interior is installed. | Coordinate panel layouts with the lift contractor and check applicable accessibility and safety requirements for the building’s location. |
| 4 | Check the lift’s rated load and weight allowance | Confirm rated capacity from the lift documentation and obtain the permitted allowance for new interior finishes from the responsible lift professional. | Stone, glass, metal, and added framing can increase car mass. Any weight change must be assessed against the lift’s design and approved limits. | Request material weights in kg/m² and calculate estimated added mass from the measured surface areas. Do not assume the rated passenger capacity is an allowance for finishes. |
| 5 | Measure the ceiling and lighting envelope | Record ceiling height, available void depth, existing light positions, ventilation openings, and access panels. | A lowered or redesigned ceiling can obstruct ventilation, lights, equipment access, or other services. | Coordinate the ceiling section with the lift contractor. Specify accessible service panels and confirm that lighting and ventilation openings remain unobstructed. |
| 6 | Identify ventilation and temperature constraints | Locate grilles, fans, air paths, and any temperature-sensitive equipment. Confirm the lift’s ventilation requirements with its technical documentation. | Solid decorative coverings can reduce airflow and may affect comfort or equipment conditions. | Integrate ventilation openings into the design rather than covering them. Confirm grille free area and placement with the lift professional. |
| 7 | Choose finishes suited to the lift environment | Check finish thickness, surface weight, fixing method, cleanability, durability, and required fire-performance documentation. | Materials must be suitable for a frequently used enclosed space and must meet applicable local building and fire requirements. | Obtain product data and required certificates before approval. Verify local requirements rather than assuming one fire classification applies everywhere. |
| 8 | Plan fixing points and substrate conditions | Identify existing wall construction, available fixing zones, concealed services, and locations that cannot be drilled or loaded. | Heavy or poorly secured panels can create safety risks, while drilling in restricted areas may damage lift equipment or wiring. | Use an approved fixing strategy and have attachment details reviewed by the lift contractor or other responsible technical professional. |
| 9 | Check thresholds, floor build-up, and trip edges | Measure the cabin floor level against the landing sill. Record existing floor thickness, edge details, and the clearance available for any new finish. | Added flooring can create a level change, reduce door clearance, or affect the transition at the entrance. | Detail a secure, durable floor edge and verify the finished floor relationship to the landing before installation. |
| 10 | Document the survey and confirm approvals | Prepare a dimensioned plan, elevations, photographs, material schedule, estimated added mass, and a list of unresolved technical questions. | A complete survey helps prevent fabrication errors and makes design review more efficient. | Obtain written confirmation of relevant clearances, materials, fixings, and any required inspections before ordering or installing custom components. |
Important: Dimensions and technical limits are project-specific. Verify measurements on site and confirm applicable lift, building, fire, and accessibility requirements with qualified professionals and the relevant local authorities before fabrication or installation.
Tip: Choose materials that feel refined but can handle daily contact. Brushed metal resists obvious fingerprints better than a mirror-polished surface, though it still needs regular wiping. A stone-look panel can add visual weight without making the cabin feel cold. Check samples under the lift’s actual lighting; a warm beige may look gray once installed. Small test panels help.
For finishes, balance contrast with maintenance. Pair satin metal trim with matte wall panels, or use a polished detail as a narrow accent. Too many reflective surfaces can make a compact cabin feel busy. Consider textured upholstery or a durable wall covering where passengers are likely to brush against the walls. Ask for cleaning guidance before settling on a finish. It is easy to overlook.
Tip: Keep the color palette focused. Two main tones and one accent usually feel composed. Deep green or navy can add depth, while pale neutrals help a smaller lift feel open. Decorative details should have a reason: a slim inlay, subtle geometric pattern, or warm concealed lighting can create character. Review the design from the doorway and inside the cabin. A detail that looks elegant on a sample may feel fussy at full scale, so leave room to revise.
A luxury lift should feel calm before it feels impressive. Use layered lighting: soft ceiling illumination, vertical light near the mirror, and discreet indicators that remain readable without glare. Dimming helps the cabin shift from bright daytime use to a gentler evening mood. A glossy finish can look elegant, but it may reflect controls and confuse some passengers. Test materials under the actual lighting, not only in a showroom.
Tip: Place controls within comfortable reach, use clear contrast, and label buttons with legible text and tactile markings. The World Health Organization’s 2023 disability fact sheet estimates that 1.3 billion people—about one in six worldwide—experience significant disability. That makes inclusive control design practical, not merely decorative. Check applicable accessibility codes with a qualified professional; requirements vary by location. Keep it simple.
Tip: Choose a handrail with a secure grip, seating only where cabin dimensions allow, and flooring that feels stable underfoot. Ventilation, quiet door operation, and warm but durable finishes matter on everyday trips. Ask users to test a full journey, including entry, turning, and reaching controls. One detail may still be missed. Revise the design after real feedback.
Treat installation and maintenance as design inputs, not final checks. Before selecting stone, metal, or stitched leather, ask the lift contractor to confirm cabin dimensions, panel fixing points, door clearances, and allowable added weight. A dramatic stone-look panel may work better as a lightweight, replaceable finish. Request a full-size sample. View it under the cabin’s actual lighting, since warm LEDs can shift beige tones toward yellow. Confirm that seams, fasteners, and edge trims remain reachable without damaging adjacent surfaces. Small details matter.
Agree on installation sequencing with the site team. Protect finished panels during transport, and leave room for tools around service access points. Ask how routine cleaning affects each surface; textured metal can hold fingerprints, while deep grooves collect dust. Specify suitable cleaners and a simple replacement method in the handover documents. Keep spare finish pieces when practical. Maintenance staff should be able to remove one panel without dismantling half the cabin. That goal can limit intricate detailing. Still, compromises are worth testing early: a beautiful corner joint may loosen if the cabin flexes or sees heavy daily use. Review a mock-up with the installer and service team before production. Not every choice will age well.
Start with a clear purpose, such as a calm home ride or a welcoming hotel entrance. Set a few priorities: durability, privacy, warmth, and easy cleaning. Keep the list short.
Watch how people enter, turn, reach controls, and carry groceries or luggage. Ask what feels awkward, not just what looks attractive. Their feedback may unsettle the original plan.
Brushed metal shows fewer obvious fingerprints than mirror-polished metal, but it still needs wiping. Textured wall coverings can soften a cabin, though dust may collect in their corners. Check cleaning instructions.
Use two main colors and one accent for a composed look. Pale neutrals can make a small cabin feel more open. A slim inlay or gentle geometric pattern may be enough.
Actual lighting can change how a finish looks. Warm beige may appear gray, while glossy panels can reflect bright points. Test small panels inside the lift before choosing.
Combine soft ceiling light with vertical lighting near a mirror. Keep indicators readable without glare, and consider dimming for evening trips. Reflections can still confuse some passengers.
Place controls within comfortable reach, with clear contrast, readable labels, and tactile markings. Choose a handrail with a secure grip. Check local accessibility requirements with a qualified professional.
Stable flooring, quiet doors, and suitable ventilation make repeated trips more pleasant. Seating may help where cabin dimensions allow. Test a full journey, including entry and turning.
Not always. Ask users to try the route and reach the controls. A mock-up may still miss something, so revise it after real feedback.
Designing a custom luxury lift interior begins with clear goals and an understanding of who will use the space. Consider the building’s character, the desired atmosphere, passenger needs, and how the lift should feel during everyday use. Accurate measurements of the cabin are essential, as are checks on technical limits such as weight, fixtures, clearances, and existing equipment. These details help ensure that creative ideas can be put into practice safely and comfortably.
When considering how to design a custom interior for a luxury lift, bring materials, finishes, colors, and decorative details together in a balanced scheme. Plan lighting to create the right mood while keeping controls easy to see and operate. Comfort and accessibility should guide choices such as handrails, surfaces, and layout. Finally, coordinate every customization with installation requirements and future maintenance, so the finished interior is attractive, practical, durable, and suited to the lift’s long-term use.